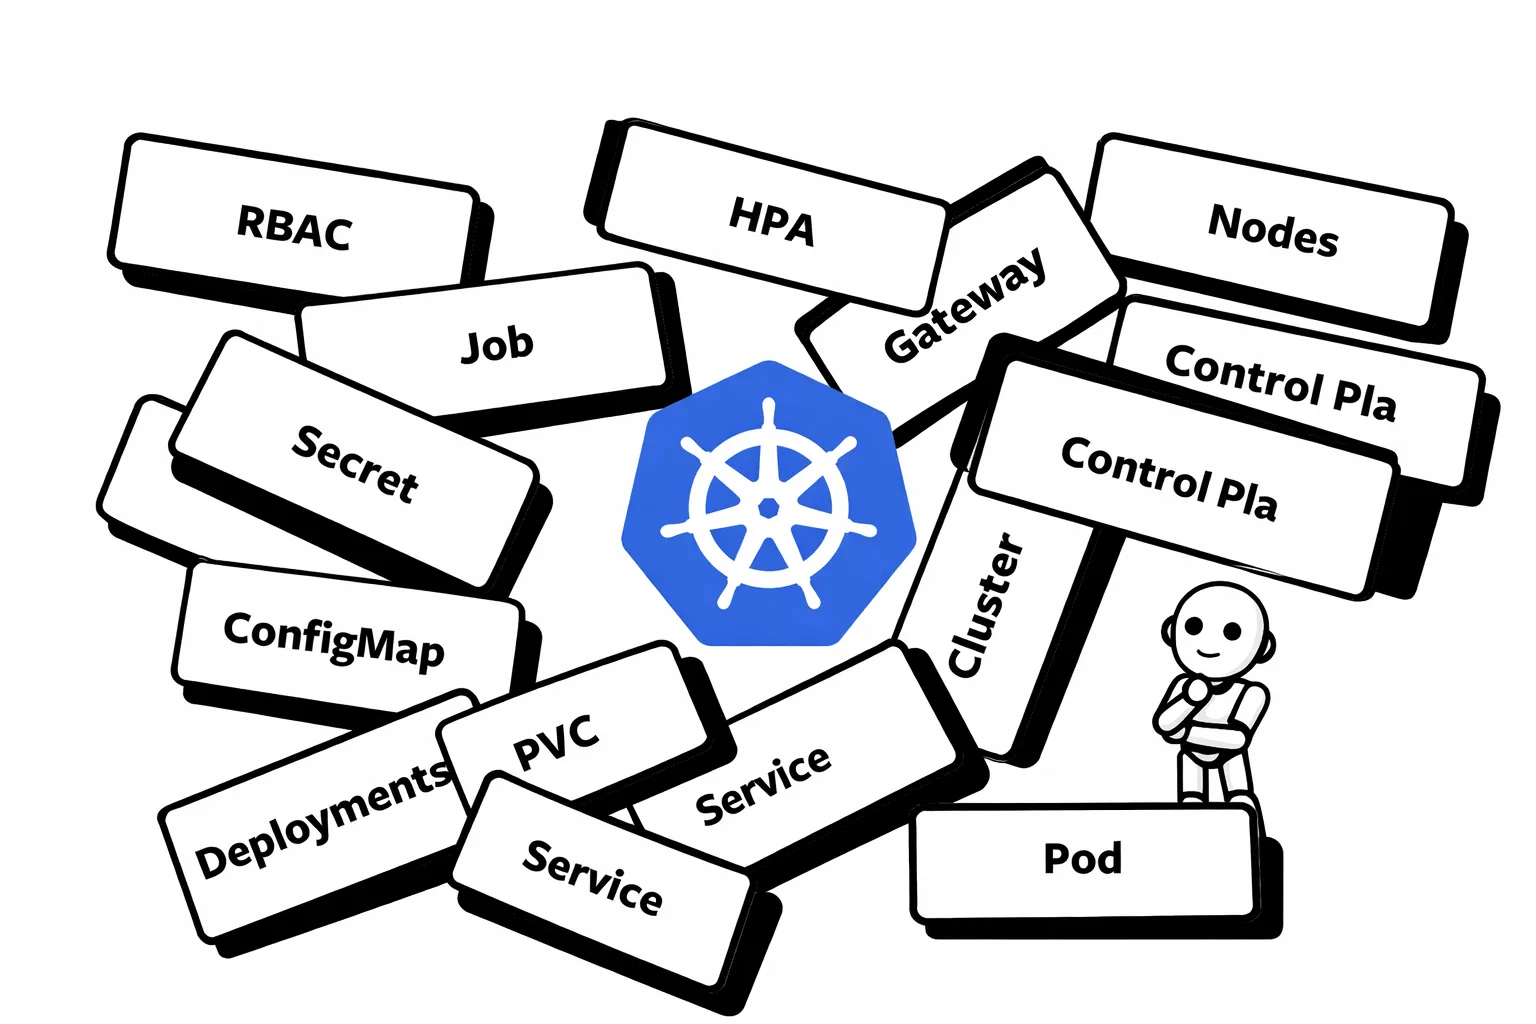

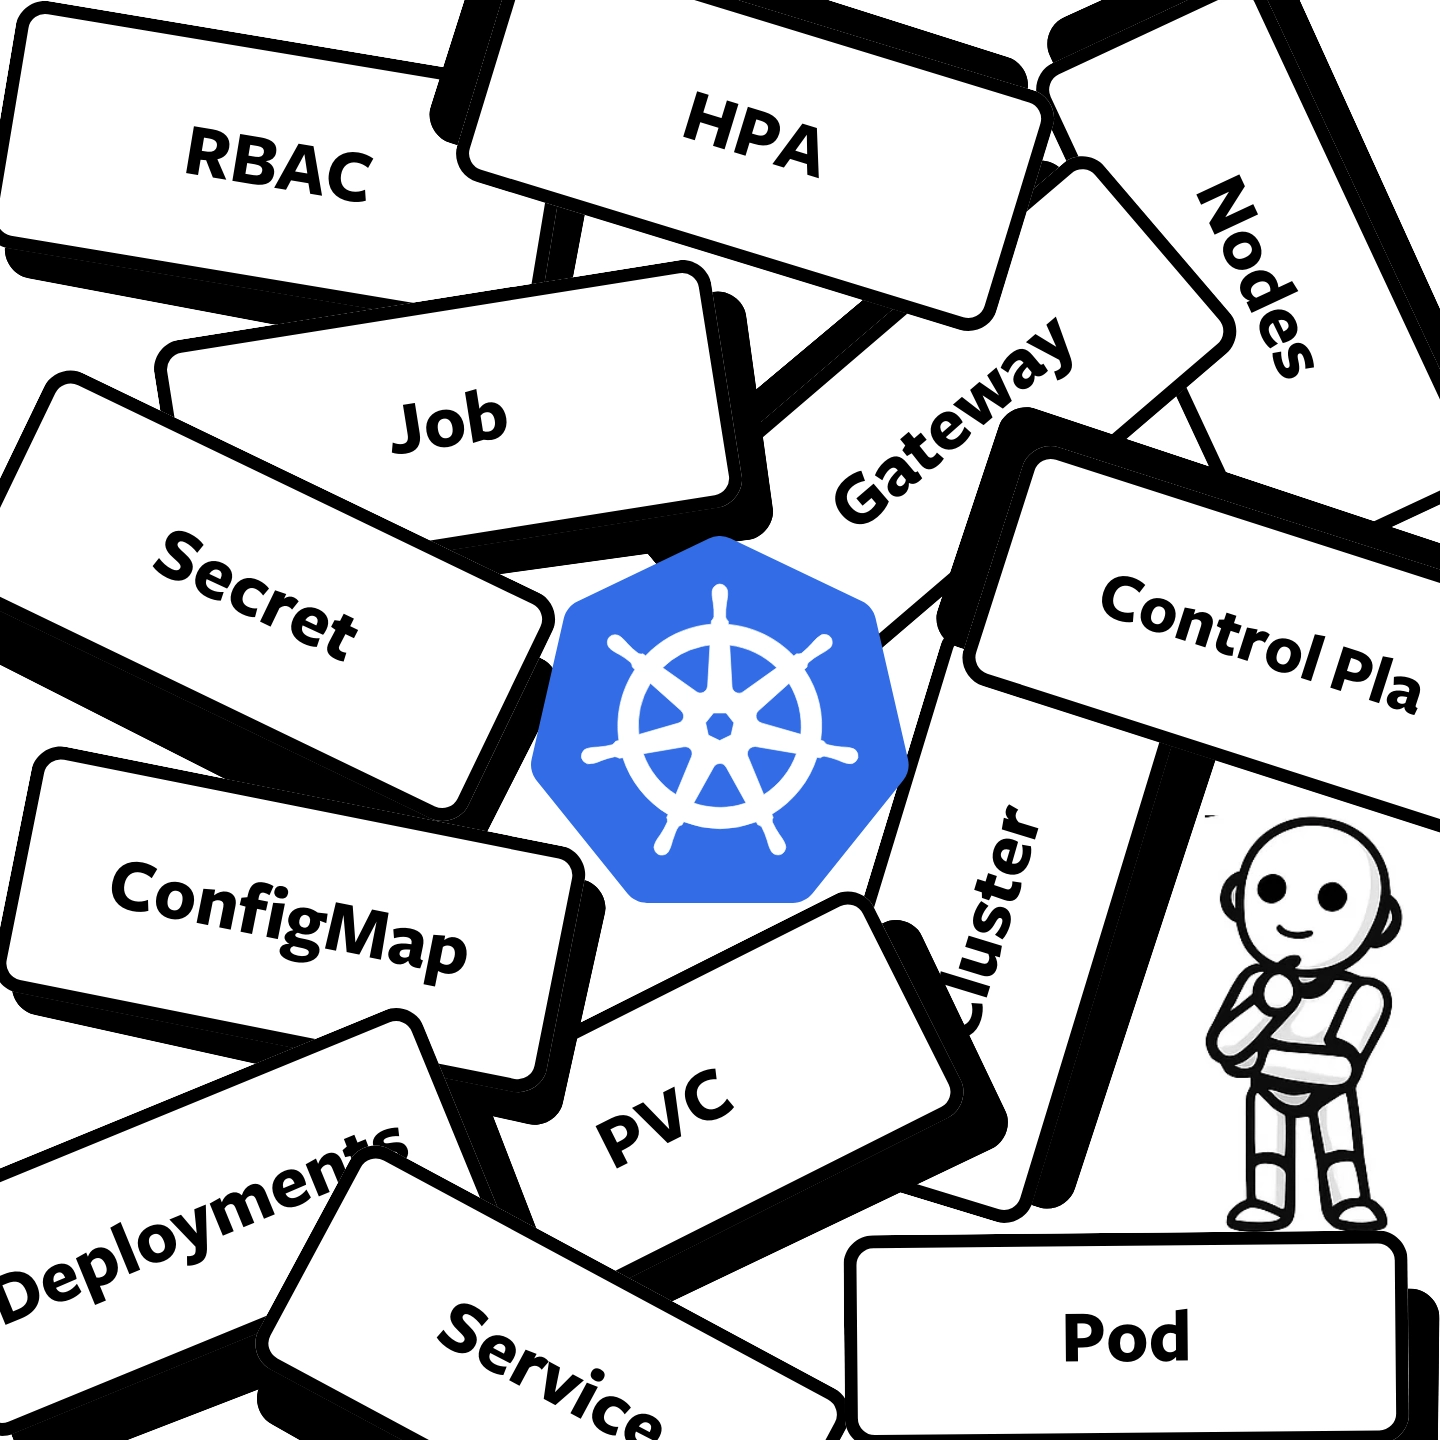
A Kubernetes beginner roadmap that goes through all k8s concepts with links to external documentation and exercises.
TL;DR
- I’ve written the Kubernetes (k8s) beginner guide I would have liked to have before starting
- k8s can be difficult to learn because the documentation doesn’t provide a clear path through the core concepts
- This learning roadmap walks you through all the concepts you need before starting with on-prem or cloud k8s
- For each concept, you’ll find a minimal explanation, clear visuals, a CLI demo, and an exercise for you to practice
For the past few years, I’ve worked in startup environments where learning is your bread and butter.
I’ve had the chance to learn different programming languages, software best practices, data engineering, infrastructure as code, machine learning, and MLOps.
Here’s the recurring pattern: it’s always hard at the beginning.
But when I started to learn Kubernetes (k8s) a few weeks ago, something struck me: it was harder than most.
Yes, it’s a complex tool with multiple overlapping concepts. But that’s not what makes it so difficult.
I’ve found it was easy to get lost through the documentation as it doesn’t provide a clear path to walk you through the main concepts.
I struggled to distinguish what’s important from what’s not.
Luckily, I asked seasoned Kubernetes practitioners for some tips, and I feel ready to share them.
Note: this article was 100% written with love and 0% with AI. So sit back and enjoy the ride!
Kubernetes Active Learning Roadmap
There are many articles on how to start with Kubernetes, but I’ve found that they miss the most important: active learning.
What worked best for me was to practice a hands-on exercise as soon as I learned a concept.
So in this article, I will:
Explain all the Kubernetes core concepts
Walk you through a CLI example for each concept (if applicable)
Give you an exercise to do for each concept
This article is quite long. It’s the guide I would have liked to have before starting.
Think of it as a roadmap for k8s with simple explanations, links to in-depth documentation, and exercises.
Use the table of contents to quickly get to the sections you’re interested in, and don’t forget that the exercises are the most important part of the journey!
By the end of this guide, you’ll be ready to start with on-premise k8s, Google’s GKE, or Amazon’s EKS.
Prerequisites

Killercoda has many scenarios that helped me practice k8s | Source: Killercoda
Before starting, make sure you have a basic understanding of these prerequisite concepts.
Next, log in to Killercoda. It’s an amazing site with managed k8s instances that provides plenty of exercices.
People usually prepare the Certified Kubernetes Administrator (CKA) certification on this platform.
But I’ve found that it’s the best place to learn, even if you’re not planning to pass this certification.
Finally, you’ll need to install the following tools:
kubectl is the command line tool that allows you to interact with Kubernetes from your CLI.
minikube to run Kubernetes locally.
docker for the container runtime.
helm as a package manager for Kubernetes.
Follow the install tools documentation from Kubernetes (you don’t need kind and kubeadm for this practice) to configure them on your local machine.
If you are on MacOS, I recommend Colima as it allows you to run Docker with minimal dependencies:
brew install colima
colima start
Otherwise, install the Docker Engine according to your distribution.
Finally, install helm by running:
curl -fsSL -o get_helm.sh https://raw.githubusercontent.com/helm/helm/main/scripts/get-helm-4
chmod 700 get_helm.sh
./get_helm.sh
Alternatively, you can follow the Helm install documentation.
Kubernetes Architecture

The main components of the Kubernetes architecture | Source: Kubernetes
We’ll first study Kubernetes’ architecture. It will be very helpful to understand the big picture before diving into the hands-on practice.
Cluster
Let’s start with the most high-level entity: the Cluster. Here’s the definition from the Kubernetes official glossary:
A Kubernetes Cluster is a set of worker machines, called nodes, that run containerized applications. Every cluster has at least one worker node | Source: Kubernetes
That can be confusing when we don’t know what a node is.
Personally, I prefer this definition:
A Kubernetes Cluster is an instance of Kubernetes that orchestrates containerized applications.
We can have multiple instances of Kubernetes (clusters) running in an organization. Where each cluster has the same architecture but runs different applications.
Time to run a cluster locally.
On MacOS, always remember to run colima before running minikube:
colima startUse minikube to start your local Kubernetes cluster:
minikube startThen, we can use kubectl to get information about the cluster:
kubectl cluster-infoKubernetes control plane is running at https://127.0.0.1:32771
CoreDNS is running at https://127.0.0.1:32771/api/v1/namespaces/kube-system/services/kube-dns:dns/proxyPods
A Pod is a group of containers sharing storage, network resources, and specs on how to run these containers.
It is the smallest deployable unit in Kubernetes.
Containers within a Pod:
Share the same network namespace and can communicate via localhost.
Have unique IP addresses. They’re dynamic and change upon recreation.
Kubernetes resources can be created using .yaml files. Here’s an example of a simple-pod.yaml configuration:
apiVersion: v1
kind: Pod
metadata:
  name: nginx
spec:
  containers:
  - name: nginx
    image: nginx:1.14.2
    ports:
    - containerPort: 80
It runs an NGINX container exposing the port number 80.
Let’s create a Pod now:
kubectl apply -f https://k8s.io/examples/pods/simple-pod.yamlWe can then list all the Pods in our Cluster:
kubectl get podsNAME READY STATUS RESTARTS AGE
nginx 1/1 Running 0 32sFinally, we can delete this Pod by running:
kubectl delete pod nginxIf you want more information, read the Kubernetes offical Pod documentation.
Tip #2: kubectl has a very handy feature: the explain command. For example, if you’re unsure about what the containers field is, type:
kubectl explain pod.spec.containersKIND: Pod
VERSION: v1
FIELD: containers <[]Container>
DESCRIPTION:
List of containers belonging to the pod. Containers cannot currently be
added or removed. There must be at least one container in a Pod. Cannot be
updated.
A single application container that you want to run within a pod.
FIELDS:
args <[]string>
Arguments to the entrypoint. The container image's CMD is used if this is
not provided. Variable references $(VAR_NAME) are expanded using the
container's environment. If a variable cannot be resolved, the reference in
the input string will be unchanged. Double $$ are reduced to a single $,
which allows for escaping the $(VAR_NAME) syntax: i.e. "$$(VAR_NAME)" will
produce the string literal "$(VAR_NAME)". Escaped references will never be
expanded, regardless of whether the variable exists or not. Cannot be
updated. More info:
https://kubernetes.io/docs/tasks/inject-data-application/define-command-argument-container/\#running-a-command-in-a-shellYou can do this for any field in Kubernetes configurations.
Now you’re ready for your first Killercoda scenario!
Exercise #1: solve the create a pod declaratively problem.
Tip #3: the Kubernetes official documentation is allowed when solving CKA problems.
Worker Nodes
A Node is a virtual (VM) or physical machine running workloads by executing Pods that run containerized applications.
It contains:
A Kubelet: node agent responsible for creating and managing Pods on a Node (applies PodSpecs via a container runtime like containerd or CRI-O).
A Kube-proxy: monitors Services changes and implements networking rules to match these changes
One or more Pods
When running minikube, only one Node is running:
kubectl get nodesNAME STATUS ROLES AGE VERSION
minikube Ready control-plane 12d v1.34.0In production, you’ll be able to run as many Nodes as necessary using tools such as k3d on-premise, GKE or EKS in the cloud.
For more information, read the Nodes, Kubelet, and kube-poxy documentation.
Control Plane

The core components of a Kubernetes Cluster | Source: Kubernetes
The Control Plane manages the state of the Cluster.
It contains the following components:
API Server: exposes Kubernetes functionality using an API. It handles REST API requests for communication and managing the Cluster.
etcd: key-value store containing the desired state of the Cluster.
Scheduler: finds where to place Pods in Nodes.
Cloud Control Manager (optional): integrates cloud providers (GCP, AWS, etc.) APIs with Kubernetes.
Control Manager: manages multiple controllers responsible for implementing the K8s API’s behavior.
When we make a request to the API Server, the request is recorded in the desired state (etcd). Controllers come into play to make the actual state of the cluster closer to the desired state.
Here’s a non-exhaustive list of controllers:
Node Controller: responsible for noticing and responding when nodes go down.
Job Controller: watches for Job objects that represent one-off tasks, then creates Pods to run those tasks to completion.
EndpointSlice Controller: populates EndpointSlice objects (to provide a link between Services and Pods).
ServiceAccount Controller: create default ServiceAccounts for new namespaces.
We can see the Pods running the components of the control plane by running:
kubectl get pods -n kube-systemNAME READY STATUS RESTARTS AGE
coredns-66bc5c9577-bs6wf 1/1 Running 6 (21h ago) 13d
etcd-minikube 1/1 Running 6 (21h ago) 13d
kube-apiserver-minikube 1/1 Running 6 (21h ago) 13d
kube-controller-manager-minikube 1/1 Running 6 (21h ago) 13d
kube-proxy-klzkn 1/1 Running 6 (21h ago) 13d
kube-scheduler-minikube 1/1 Running 6 (21h ago) 13d
storage-provisioner 1/1 Running 13 (21h ago) 13dWe used -n to investigate the Pods in the kube-system namespace (we’ll see this concept in the namespace section).
As you can see, all the Control Plane components we talked about run in their respective Pod.
Kubernetes API Objects
Now that we understand Kubernetes’ architecture, we’ll learn about the most important API objects (or concepts).
You’ll likely come across these objects in most k8s applications.
Deployment and ReplicaSet

Relationship between Deployment, ReplicaSets, Nodes and Pods | Source: Yankee Maharjan on Medium
A Deployment is a Kubernetes object that creates and manages a ReplicaSet that maintains a set of identical Pods running at any given time.
Using Deployments instead of manually creating pods has several advantages:
Rollback: allows you to return to a previous version.
Rolling Updates: updates the Pods’ versions progressively (more on this through the rolling update documentation).
Scales: you can manually change the number of Pods from the configuration (we will discuss auto-scaling later).
Self-healing: deletes and re-creates unhealthy Pods.
In practice, we usually never create a single Pod as we did in the previous Pods section.
Let’s create a Deployment that manages multiple NGINX Pods instead.
We’ll use the nginx-deployment.yaml file from Kubernetes’ Deployment documentation:
# nginx-deployment
apiVersion: apps/v1
kind: Deployment
metadata:
  name: nginx-deployment
  labels:
    app: nginx
spec:
  replicas: 3
  selector:
    matchLabels:
      app: nginx
  template:
    metadata:
      labels:
        app: nginx
    spec:
      containers:
      - name: nginx
        image: nginx:1.14.2
        ports:
        - containerPort: 80
Here’s some explanation on this configuration:
We use the metadata.labels to tag the deployment.
Then, we match the label in spec.selector.matchLabels to specify which Pods will be owned by the Deployment.
spec.template.metadata.labels is used to assign labels to the Pods that will be created by this Deployment.
We choose the number of identical Pods using the replicas field.
Finally, the spec.template.spec.containers field contains the specification of the container managed by the Pod.
Time to apply the configuration:
kubectl apply -f nginx-deployment.yamlWe can see the deployment information by running:
kubectl get deployments -o wideNAME READY UP-TO-DATE AVAILABLE AGE CONTAINERS IMAGES SELECTOR
nginx-deployment 3/3 3 3 3m38s nginx nginx:1.14.2 app=nginxThe ReplicaSet can also be observed:
kubectl get replicasets -o wideNAME DESIRED CURRENT READY AGE CONTAINERS IMAGES SELECTOR
nginx-deployment-bf744486c 3 3 3 11m nginx nginx:1.14.2 app=nginx,pod-template-hash=bf744486cThere are also 3 nginx Pods running:
kubectl get podsNAME READY STATUS RESTARTS AGE
nginx-deployment-bf744486c-hqsbv 1/1 Running 0 5m52s
nginx-deployment-bf744486c-qtxc4 1/1 Running 0 5m52s
nginx-deployment-bf744486c-xjpfx 1/1 Running 0 5m52sHere’s what’s wonderful: if we delete a Pod (or if it crashes), the ReplicaSet spawns it again:
kubectl delete pod nginx-deployment-bf744486c-hqsbvpod "nginx-deployment-bf744486c-hqsbv" deleted from default namespaceIt is instantly re-created with another identifier:
kubectl get podsNAME READY STATUS RESTARTS AGE
nginx-deployment-bf744486c-qtxc4 1/1 Running 0 7m48s
nginx-deployment-bf744486c-rnff6 1/1 Running 0 4s
nginx-deployment-bf744486c-xjpfx 1/1 Running 0 7m48sTime for you to practice!
Exercise #2: solve the create and scale apache deployment scenario.
StatefulSet
A StatefulSet manages the deployment and scales a set of Pods where ordering and uniqueness matter.
Each Pod has the same specifications but is not interchangeable.
StatefulSets maintains a consistent name for each pod: pod_1, pod_2, …, pod_n.
Use StatefulSets instead of Deployments for:
Databases
Distributed systems
Applications needing persistent storage
Anything that needs to retain memory.
More on this through the StatefulSet documentation.
Now, let’s take a look at the following diagram, where multiple MongoDB Pods are managed by a StatefulSet:
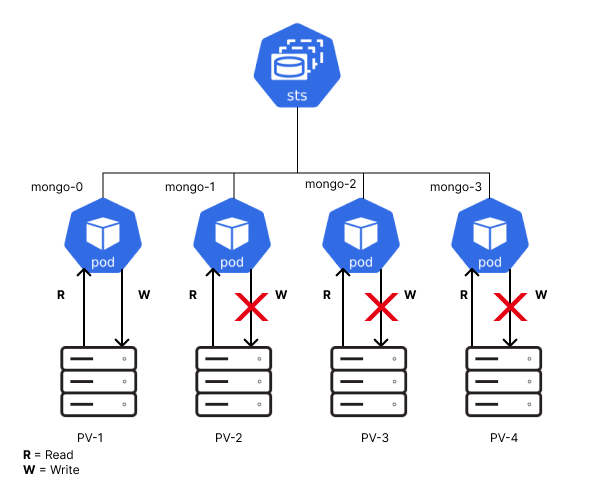
Example of MongoDB StatefulSet | Source: Abhinav Dubey on Devtron
The first Pod has read and write permission while, the others are read-only.
This is useful as it prevents data corruption from concurrent writes. It also ensures high availability by distributing the read requests across instances.
Note: the StatefulSet does not manage permissions, it only maintains the uniqueness and ordering of identical Pods.
Exercise #3: run the first part of the Kubernetes StatefulSet scenario and come back to it once you’ve read the Persistent Volume (PV) and Persistent Volume Claim (PVC) sections.
Service

Relationship between a user, a Service and Pods | Source: Zulfi Ahamed on SpectroCloud
A Service exposes one or multiple Pods (Deployment, ReplicatSet, StatefulSet, etc.) in a Cluster behind an endpoint.
As Pods are dynamic, their IP addresses change. A Service is particularly useful as it is a permanent interface to interact with Pods.
There are multiple types of Services:
ClusterIP: a static internal IP to access Pods.
NodePort: exposes a port on each Node’s static IP to access Pods (under the hood, a ClusterIP is also created and its IP is used).
Load Balancer: exposes a service using an external load balancer (outside the cluster).
Let’s create a service on top of the resource we created in the Deployment and ReplicaSet section:
# service-nginx.yaml
apiVersion: v1
kind: Service
metadata:
  name: nginx
spec:
  selector:
    app: nginx
  type: ClusterIP
  ports:
    - protocol: TCP
      port: 8080
      targetPort: 80
In this service configuration, we:
Use spec.selector to target all the Pods from the nginx-deployment we created earlier using the label app: nginx.
Create a ClusterIP service using spec.type.
Set spec.ports.targetPort to the same port the nginx Pods are listening to (i.e 80).
Set spec.ports.port so the service is accessible through port 8080.
Time to create the service:
kubectl apply -f service-nginx.yamlWe can see the service has been created by running:
kubectl get serviceNAME TYPE CLUSTER-IP EXTERNAL-IP PORT(S) AGE
kubernetes ClusterIP 10.96.0.1 <none> 443/TCP 28d
nginx ClusterIP 10.109.21.121 <none> 8080/TCP 3sWe can check that the nginx service is linked to the Pods managed by the nginx-deployment:
kubectl get endpointsliceNAME ADDRESSTYPE PORTS ENDPOINTS AGE
kubernetes IPv4 8443 192.168.49.2 28d
nginx-p5k2b IPv4 80 10.244.0.64,10.244.0.63,10.244.0.65 4m21sThe ENDPOINTS field contains three distinct IPs.
Now we verify if these IPs correspond to the right Pods:
kubectl get pods -l app=nginx -o jsonpath='{.items[*].status.podIP}'10.244.0.64 10.244.0.63 10.244.0.65Yes, they match!
Here’s more information about how we could retrieve the nginx-deployment Pod IPs:
We use the -l (i.e --selector) option with the same selector as the service
We use -o (i.e --output) with jsonpath to extract specific fields from the JSON output.
We use the .items[*] path to access all pods, then navigate to status.podIP to get each pod’s IP address.
Next, let’s see if we can access the NGINX web server through our service.
We’ll need to port forward from our cluster to our host, as the service does not serve traffic outside of the cluster:
kubectl port-forward service/nginx 8080:8080Finally, open your browser on http://localhost:8080, and you should land on your NGINX webserver page.
Exercise #4: solve the resolve service IP from Pod scenario.
Use the Kubernetes Service documentation for this exercise.
Namespace
[Image unavailable: HTTP 403]
Content of three Kubernetes namespaces | Source: WizOps
A Namespace isolates groups of resources in a cluster.
By default, there are multiple namespaces in your local cluster:
kubectl get namespaceNAME STATUS AGE
default Active 23d
kube-node-lease Active 23d
kube-public Active 23d
kube-system Active 23dMost Kubernetes objects, such as Pods, Deployments, and Services, are bound to a namespace.
The -n option allows us to scope our CLI commands to a particular namespace.
By running the following command, we can see the Deployments in the kube-system namespace:
kubectl get deployments -n kube-systemNAME READY UP-TO-DATE AVAILABLE AGE
coredns 1/1 1 1 23d
metrics-server 1/1 1 1 15dWhen we do not use the -n option, our CLI commands are scoped to the default namespace:
# Equivalent to:
# kubectl get pod -n default
kubectl get pod
No resources found in default namespace.We can create a namespace using:
kubectl create namespace demo
kubectl get namespace demo
NAME STATUS AGE
demo Active 11sLet’s create the same demo Pod as in the Pods section, but this time in the demo namespace:
kubectl apply -f https://k8s.io/examples/pods/simple-pod.yaml -n demoNow, if we get the Pods in the demo namespace, we see:
kubectl get pod -n demoNAME READY STATUS RESTARTS AGE
nginx 1/1 Running 0 74sThe default namespace still has no Pod:
kubectl get podNo resources found in default namespace.Namespaces are particularly useful to group related k8s resources when they are part of a broader application.
Here’s Kubernetes’ Namespaces documentation if needed.
Exercise #5: solve the list the Pods and their IP addresses scenario.
ConfigMap
A ConfigMap is a Kubernetes object that stores non-confidential data in key-value pairs.
It is useful to separate environment configurations from container images.
ConfigMaps can be passed to Pods as:
Environment variables
CLI arguments
Mounting a volume containing a config file
Suppose you have a container that prints logs, and you want to be able to add the environment (i.e dev, prod, etc.) to them.
Let’s store the environment name using a ConfigMap with the following config-map-env.yaml:
apiVersion: v1
kind: ConfigMap
metadata:
  name: env-dev
data:
  environment: "dev"
Next, we create the ConfigMap:
kubectl apply -f config-map-env.yamlThen, we create a pod-print-env.yaml Pod configuration file:
apiVersion: v1
kind: Pod
metadata:
  name: print-env-dev
spec:
  containers:
    - name: print-env-dev
      image: busybox
      command: ["/bin/sh", "-c"]
      args: ["echo $ENVIRONMENT_NAME && sleep 3"]
      env:
        - name: ENVIRONMENT_NAME
          valueFrom:
            configMapKeyRef:
              name: env-dev
              key: environment
This Pod:
Runs a minimal Linux busy-box distribution
Echos the ENVIRONMENT_NAME env variable
Retrieves the environment name from the env-dev config map
We proceed by applying this configuration:
kubectl apply -f pod-print-env.yamlThe Pod is running:
kubectl get podNAME READY STATUS RESTARTS AGE
print-env-dev 0/1 Completed 0 6sFinally, we verify if the container running in the Pod prints the right environment name:
kubectl logs print-env-devdevPerfect! Now you know how to pass ConfigMaps to Pods.
For more information, read Kubernetes’ Namespaces documentation.
Exercise #6: solve the ConfigMaps in Kubernetes scenario.
Secret
A Secret is a Kubernetes object containing confidential data in key-value pairs.
It is very similar to ConfigMaps except that it is used for sensitive data.
We can specify the type of a Secret using the type field.
Here’s a table from the Kubernetes Secret documentation:
Built-in Type | Usage |
|---|---|
| arbitrary user-defined data |
| ServiceAccount token |
| serialized |
| serialized |
| credentials for basic authentication |
| credentials for SSH authentication |
| data for a TLS client or server |
| bootstrap token data |
When the type field is not used, the Secret is set with the Opaque type.
Let’s create a basic-auth secret using this secret.yaml configuration file:
apiVersion: v1
kind: Secret
metadata:
  name: secret-basic-auth
type: kubernetes.io/basic-auth
stringData:
  username: admin
  password: mypassword
Next, we create the Secret:
kubectl apply -f secret.yamlWe can see that the Secret has been created by running:
kubectl get secretNAME TYPE DATA AGE
secret-basic-auth kubernetes.io/basic-auth 2 10sNow, it’s time to create a Pod configuration pod-print-secret.yaml that uses this Secret:
apiVersion: v1
kind: Pod
metadata:
  name: print-secret
spec:
  containers:
    - name: print-secret
      image: busybox
      command: ["/bin/sh", "-c"]
      args: ["echo Username: $USERNAME && echo Password: $PASSWORD && sleep 3"]
      env:
        - name: USERNAME
          valueFrom:
            secretKeyRef:
              name: secret-basic-auth
              key: username
        - name: PASSWORD
          valueFrom:
            secretKeyRef:
              name: secret-basic-auth
              key: password
We passed the secret content to the container as environment variables using the field spec.containers[].env[].valueFrom.secretKeyRef.
Let’s create the Pod:
kubectl apply -f pod-print-secret.yamlCheck the logs to verify the Secret values were passed correctly:
kubectl logs print-secretUsername: admin
Password: mypasswordGreat! Now you know how to pass Secrets to Pods as environment variables.
Note: This example is for educational purposes. To create and use Secrets securely, read the Kubernetes Secrets Good Practice documentation.
Exercise #7: solve the workload and scheduling scenario.
Storage

An admin creates a PersistentVolume (PV). Then, a developer creates a PersistentVolumeClaim (PVC) to request storage from the PV. Finally, the Pod can use the volume | Source: Aditya Kumar Singh on Nash Tech
There are multiple Kubernetes API objects that define the availability of storage and how Pods can access it.
But first, we need to define what a volume is:
A volume is a directory accessed by entities (Node, Pod, etc.) to retrieve and share data through a filesystem.
There are two types of volumes:
Ephemeral Volume (EV): has a lifetime linked to a specific Pod and disappears when the linked Pod is destroyed.
Persistent Volume (PV): exists beyond the lifetime of any specific Pod. It can be provisioned statically (by an admin) or dynamically.
Users can request storage from a PV by creating a Persistent Volume Claim (PVC).
The claim is answered by binding an appropriate PV using an access mode (ReadWriteOnce, ReadOnlyMany, etc.).
Providers create StorageClass(es) that define how a PV:
is dynamically provisioned
is backed up
has its Quality of Service (QoS)
is reclaimed
has backed policies
Here are common types of volume:
emptyDir: an empty directory created when a Pod is assigned to a Node. As an EV, the directory is deleted when the Pod is removed.
hostPath: mounts a directory from the host’s filesystem.
AWS EBS: a Container Storage Interface (CSI) to manage the lifecycle of Elastic Block Storage (EBS).
To better understand these concepts, see the following PV configuration:
# pv.yaml
apiVersion: v1
kind: PersistentVolume
metadata:
  name: pv
spec:
  capacity:
    storage: 5Gi
  volumeMode: Filesystem
  accessModes:
    - ReadWriteOnce
  persistentVolumeReclaimPolicy: Delete
  storageClassName: standard
  hostPath:
    path: /tmp/data
    type: DirectoryOrCreate
This configuration:
Uses spec.capacity.storage to allocate 5 Gb/ of storage.
Sets spec.volumeMode to Filesystem to mount a directory into Pods (see Raw Block Volume for an alternative).
Sets spec.accessModes[] to ReadWriteOnce so the volume can be mounted by all Pods in a single Node (see other access modes).
storageClassName is the name of the storage class from which this PV belongs. We arbitrarily use the standard name.
spec.hostPath sets the PV to create a directory inside the host (i.e minikube).
Uses persistentVolumeReclaimPolicy: Delete so that the volume is deleted when a user removes a PVC.
Let’s create the PV:
kubectl apply -f pvc.yamlWe can see the PV’s information:
kubectl get pvNAME CAPACITY ACCESS MODES RECLAIM POLICY STATUS CLAIM STORAGECLASS VOLUMEATTRIBUTESCLASS REASON AGE
pv 5Gi RWO Delete Available standard <unset> 20sNow that the PV is created, we’ll be able to claim some storage with this PVC configuration:
# pvc.yaml
apiVersion: v1
kind: PersistentVolumeClaim
metadata:
  name: pvc
spec:
  accessModes:
    - ReadWriteOnce
  volumeMode: Filesystem
  resources:
    requests:
      storage: 1Gi
As you might have noticed, we did not specify the exact target of the PVC.
We just say that we want 1Gi of storage, from volumeMode: Filesystem with accessModes: ReadWriteOnce.
Kubernetes will search for a PV to bind the PVC with these criteria.
Time to proceed by creating the PVC:
kubectl apply -f pvc.yamlWe can see to which PV the PVC has been bound:
kubectl get pvcNAME STATUS VOLUME CAPACITY ACCESS MODES STORAGECLASS VOLUMEATTRIBUTESCLASS AGE
pvc Bound pv 5Gi RWO standard <unset> 2m6sIt chose pv as it matches the criteria of the requested storage!
We can create the same simple-pod.yaml configuration as in the Pods section, but mounting the PVC in the NGINX container:
apiVersion: v1
kind: Pod
metadata:
  name: nginx
spec:
  containers:
  - name: nginx
    image: nginx:1.14.2
    volumeMounts:
    - name: storage
      mountPath: /data
    ports:
    - containerPort: 80
  volumes:
  - name: storage
    persistentVolumeClaim:
      claimName: pvc
Now we create the Pod:
kubectl apply -f simple-pod.yamlNext, we check if the volume is mounted in the Pod:
kubectl exec nginx -- df -h /dataFilesystem Size Used Avail Use% Mounted on
tmpfs 980M 12K 980M 1% /dataIt has approximately 1Gi of storage just as requested!
Finally, we verify if the mounted volume is our pvc:
get pod nginx -o jsonpath='{.spec.volumes[*].persistentVolumeClaim.claimName}'pvcThat’s right! A volume of 1Gi is mounted in the Pod, it comes from the PVC that was bound to the PV.
Exercise 9: solve the manage PV and PVC scenario.
Help yourself with the Kubernetes’ Volumes documentation.
Job
A Job is a one-off task that runs to completion and stops.
Let’s create a Job configuration that mounts a volume between the host and the running container to write the date into a file:
# job.yaml
apiVersion: batch/v1
kind: Job
metadata:
  name: write-file-timestamp
spec:
  template:
    spec:
      containers:
      - name: write-file-timestamp
        image: busybox
        command: ["sh", "-c", "echo $(date) >> /file-timestamp/date.txt"]
        volumeMounts:
        - mountPath: /file-timestamp
          name: volume
          readOnly: false
      restartPolicy: Never
      volumes:
      - name: volume
        hostPath:
          path: /tmp/file-timestamp
          type: DirectoryOrCreate
  backoffLimit: 4
Here’s what’s going on in this config:
Using spec.template.spec.volumes, we create a hostPath volume.
In spec.template.spec.containers.volumeMounts, we mount the volume of the host into the container.
With spec.template.spec.containers.command, we run a simple bash command to record the date into date.txt file inside the volume.
backoffLimit sets how much time the Job will execute a Pod until it succeeds.
Now we create the job:
kubectl apply -f job.yamlWe can see the created job by running:
kubectl get jobNAME STATUS COMPLETIONS DURATION AGE
write-file-timestamp Complete 1/1 4s 8sWhen a Job is created, it spawns one or more Pods:
pods=$(kubectl get pods --selector=batch.kubernetes.io/job-name=write-file-timestamp --output=jsonpath='{.items[*].metadata.name}')
kubectl get pods $pods
NAME READY STATUS RESTARTS AGE
write-file-timestamp-lnpsp 0/1 Completed 0 3m29sThe job is completed. Let’s see if it created the date.txt file in the volume.
But first, we’ll need to ssh into minikube as it runs inside a VM:
minikube sshNow that we’re inside the host, we can verify the content of the file:
cat /tmp/file-timestamp/date.txtWed Jan 7 14:20:17 UTC 2026Amazing! Our job performed as it should.
Notes:
Read the Kubernetes’ Job documentation for more information on Jobs.
CronJobs are useful to run Jobs on a schedule.
JobSets are a new K8s addition to run distributed jobs.
Exercise 8: solve the CKA CronJob troubleshooting scenario.
API Gateway
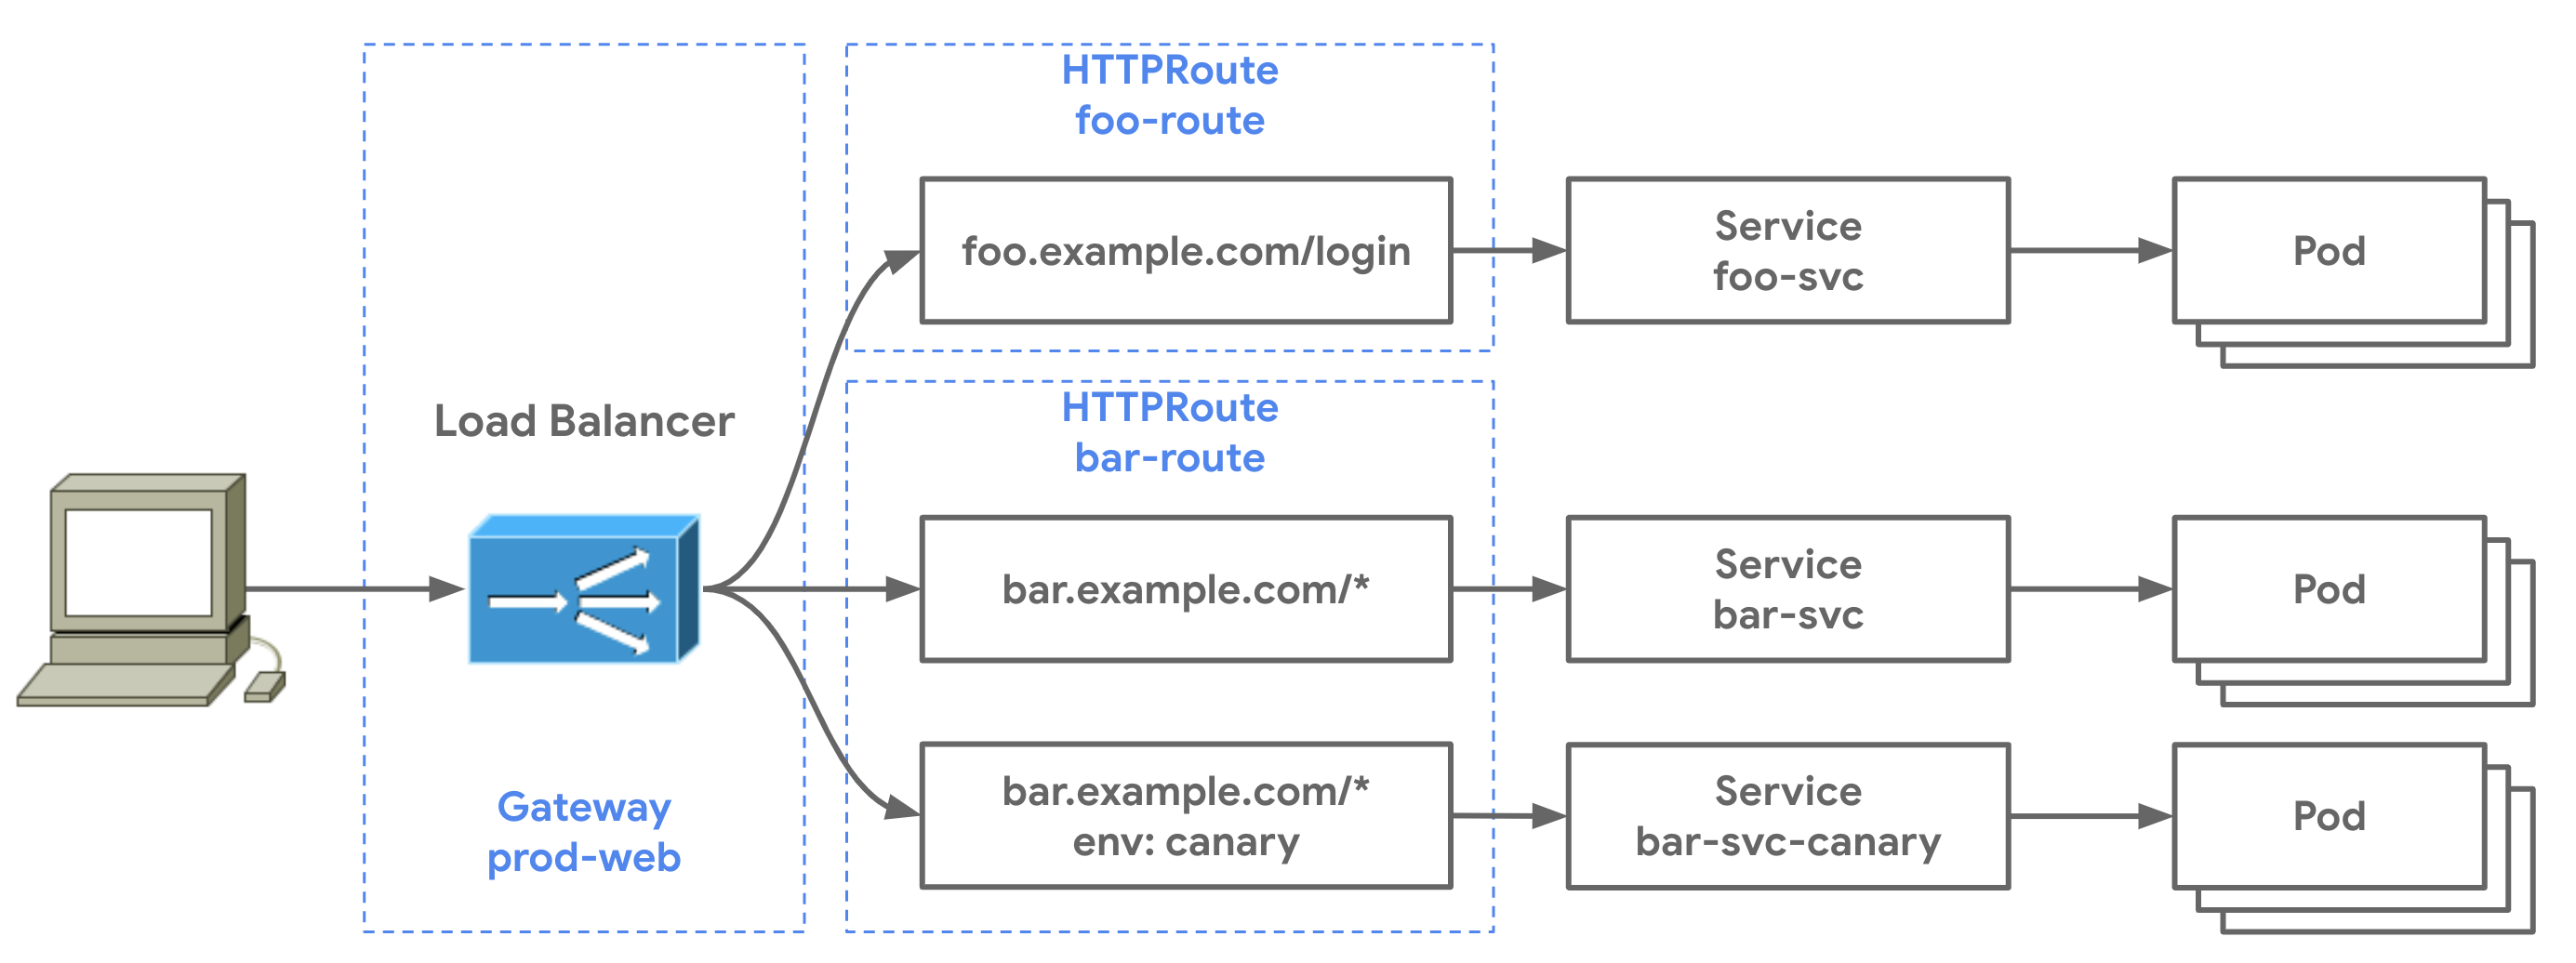
Diagram of the relationship between API Gateway object kinds | Source: Kubernetes
The Kubernetes API Gateway is a family of API kinds to handle traffic inside and outside the cluster, such as routing requests to backend services.
Note: Ingress was the K8s standard to handle traffic, and API Gateway is its successor. As API Gateway is future-proof, we’ll focus on it for this article.
As shown in the diagram above, there are four types of API Gateway kinds:
Gateway: defines a network endpoint and a listener to process traffic.
GatewayClass: defines a set of Gateways with common configuration and managed by a controller that implements the class.
HTTPRoute: defines HTTP rules for mapping traffic from a Gateway listener to a service.
GRPCRoute: defines gRPC rules to map traffic from a Gateway to a service.
Time to practice! But first we’ll need to install the API Gateway bundle as it doesn’t come out of the-box with Kubernetes.
kubectl apply --server-side -f https://github.com/kubernetes-sigs/gateway-api/releases/download/v1.4.1/standard-install.yamlIt’s because API Gateway is composed by a set of CustomResourceDefinitions (CRDs). They are resources that extend Kubernetes.
API Gateway is an interface. We’ll have to choose which Gateway implementation to use. There are two types of Gateway implementations called profiles:
Gateway Controllers: handling traffic from outside the cluster.
Mesh Controllers: handling traffic between service resources inside the cluster.
For this practice we’ll use a Gateway controller, there are many Gateway implementations available.
Envoy Gateway is easy to use, so we’ll install it now with helm:
helm install eg oci://docker.io/envoyproxy/gateway-helm --version v1.6.1 -n envoy-gateway-system --create-namespaceWait for the Envoy Gateway to be available:
kubectl wait --timeout=5m -n envoy-gateway-system deployment/envoy-gateway --for=condition=AvailableThe CRDs are now installed in our cluster:
kubectl get crd | grep gatewaybackends.gateway.envoyproxy.io 2026-01-08T14:39:33Z
backendtlspolicies.gateway.networking.k8s.io 2026-01-08T14:39:32Z
...We’ll also need an external Load Balancer so the Gateway can be assigned an external IP address.
Luckily, minikube provides an external Load Balancer that can route our host machine to the minikube cluster. We just need to open another terminal and run:
minikube tunnelLet’s proceed by creating a GatewayClass:
# gateway-class.yaml
kind: GatewayClass
apiVersion: gateway.networking.k8s.io/v1
metadata:
  name: example-gateway-class
  labels:
    example: http-routing
spec:
  controllerName: gateway.envoyproxy.io/gatewayclass-controller
It’s an object that refers to Envoy to be able to create the Gateway object further on.
Now we apply the GatewayClass:
kubectl apply -f gateway-class.yamlIt is now installed and successfully using the Envoy controller:
kubectl get gatewayClassNAME CONTROLLER ACCEPTED AGE
example-gateway-class gateway.envoyproxy.io/gatewayclass-controller True 54sNext, we create a Gateway to deploy and listen to an endpoint:
# gateway.yaml
apiVersion: gateway.networking.k8s.io/v1
kind: Gateway
metadata:
  name: example-gateway
  labels:
    example: http-routing
spec:
  gatewayClassName: example-gateway-class
  listeners:
    - name: http
      protocol: HTTP
      port: 80
Note that:
In gatewayClassName we refer to the GatewayClass we created earlier.
We created a listener on port 80.
We proceed by applying the Gateway configuration:
kubectl apply -f gateway.yamlNow we can inspect the Gateway resource:
kubectl get gatewayNAME CLASS ADDRESS PROGRAMMED AGE
example-gateway example-gateway-class 127.0.0.1 True 144mIt has been assigned the IP address 127.0.0.1 thanks to our external Load Balancer!
The last resource we need is the HTTPRoute.
For convenience, we’ll be using the service and deployment we created in the Service section:
# http-route.yaml
apiVersion: gateway.networking.k8s.io/v1
kind: HTTPRoute
metadata:
  name: example-httproute
spec:
  parentRefs:
  - name: example-gateway
  hostnames:
  - "example.com"
  rules:
  - backendRefs:
    - name: nginx
      port: 8080
It routes our Gateway with our nginx backend service and accepts the hostname example.com.
Let’s create it:
kubectl apply -f http-route.yamlAll the components are in place and we can finally test if the Gateway redirects to our nginx Pods:
curl --header "Host: example.com" http://127.0.0.1/<!DOCTYPE html>
<html>
<head>
<title>Welcome to nginx!</title>
...It works! Here’s a recap of what we achieved:
Installed Envoy Gateway, an implementation of Kubernetes’ Gateway API.
Used a GatewayClass to define a Gateway configuration managed by the Envoy controller.
Created a Gateway listening on port 80, which was assigned an external IP by the Load Balancer.
Configured an HTTPRoute to route traffic from the Gateway to the nginx service.
The nginx service (ClusterIP type) forwards requests to Pods managed by the nginx-deployment.
=> Result: Requests sent to the Gateway travel all the way down to the nginx Pods!
Time for you to practice!
Exercise 9: solve the Stranger Things Gateway Canary Deployment scenario.
Role Based Access Control (RBAC)
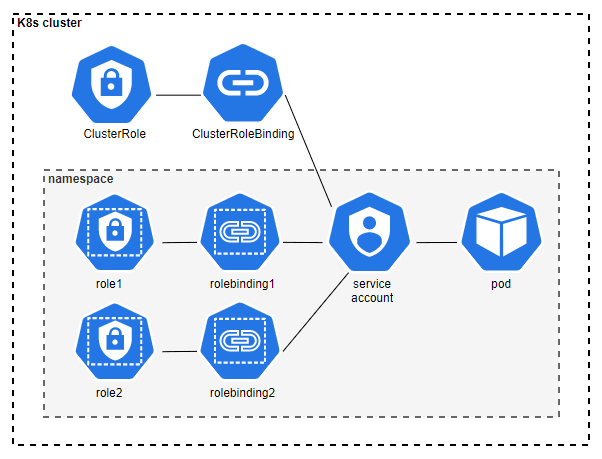
Relationship between ClusterRole, ClusterRoleBinding, Role, RoleBinding, a Service account and a Pod | Source: Renate Schosser on DynaTrace
Role Based Access Control (RBAC) is a method for regulating access to computer and network resources based on user role.
There are four kinds of RBAC objects:
Role: rules that represent a set of permissions scoped to a namespace.
ClusterRole: a Role not restricted to a particular namespace.
RoleBinding: grants the permissions defined in a Role to a user, group, or service accounts scoped to a namespace.
ClusterRoleBinding: a RoleBinding not restricted to a namespace.
Let’s create a Role, use a RoleBinding to grant permissions to a user, and ensure it can perform the actions needed.
In Kubernetes, users are managed externally.
For simplicity, we’ll use user impersonation by running kubectl --as=<username>.
First, we’ll create a namespace:
kubectl create namespace rbac-demoNow, we assume there’s a newuser in our cluster and use the --as option to impersonate it:
kubectl get pod --as=newuser -n rbac-demoError from server (Forbidden): pods is forbidden: User "newuser" cannot list resource "pods" in API group "" in the namespace "rbac-demo"Out of the box, newuser doesn’t have the required permission to list the Pods.
So we create a Role configuration with the list permission on Pods scoped on the rbac-demo namespace:
# role.yaml
apiVersion: rbac.authorization.k8s.io/v1
kind: Role
metadata:
  namespace: rbac-demo
  name: pod-reader
rules:
- apiGroups: [""]
  resources: ["pods"]
  verbs: ["get", "watch", "list"]
We apply the configuration:
kubectl apply -f role.yaml -n rbac-demoThe role has been successfully applied:
kubectl get role -n rbac-demoNAME CREATED AT
pod-reader 2026-01-10T10:21:15ZNext, we’ll need to bind the Role we created to newuser using a RoleBinding:
# role-binding.yaml
apiVersion: rbac.authorization.k8s.io/v1
kind: RoleBinding
metadata:
  name: read-pods
  namespace: rbac-demo
subjects:
- kind: User
  name: newuser
  apiGroup: rbac.authorization.k8s.io
roleRef:
  kind: Role
  name: pod-reader
  apiGroup: rbac.authorization.k8s.io
Let’s apply the configuration:
kubectl apply -f role-binding.yaml -n rbac-demoThe Role has been successfully applied to newuser:
kubectl get rolebinding -n rbac-demo -o wideNAME ROLE AGE USERS GROUPS SERVICEACCOUNTS
read-pods Role/pod-reader 57s newuserFinally, let’s see if newuser can list the Pods in the rbac-demo namespace:
kubectl get pods --as=newuser -n rbac-demoNo resources found in rbac-demo namespace.It works! However, newuser can’t list Pods in the default namespace:
kubectl get pods --as=newuserError from server (Forbidden): pods is forbidden: User "newuser" cannot list resource "pods" in API group "" in the namespace "default"That’s perfectly expected as Roles are restricted to a particular namespace.
Now it’s your turn!
Exercise 10: solve the create a role and rolebinding scenario.
Service Account
A Service Account (SA) is a non-human account that provides an entity to processes running in Pods, system components, or entities outside the cluster.
SAs are bound to a particular namespace and are useful to authenticate with the Kubernetes API Server and to apply security policies.
Kubernetes comes with a default service account that is applied to Pods if we don’t specify any SA in configurations:
kubectl get saNAME SECRETS AGE
default 0 1dIn the previous section, we used RBAC to create policies and apply them to a newuser to grant him the permission to list Pods.
This time, let’s try to list Pods but inside a Pod.
We’ll start by creating a Pod specification that uses kubectl:
# pod-get-pods.yaml
apiVersion: v1
kind: Pod
metadata:
  name: get-pods
spec:
  containers:
  - name: get-pods
    image: alpine/kubectl:1.35.0
    command: ["kubectl", "get", "pods", "-n", "kube-system"]
We apply the Pod:
kubectl apply -f pod-get-pods.yamlAs you can see below, the STATUS field of the Pod is in the Error state:
kubectl get pod get-podsNAME READY STATUS RESTARTS AGE
get-pods 0/1 Error 0 2sWe check the logs to understand the cause of the error:
kubectl logs get-podsError from server (Forbidden): pods is forbidden: User "system:serviceaccount:default:default" cannot list resource "pods" in API group "" in the namespace "kube-system"It basically says that the default SA cannot list Pods, so we’ll fix that with this SA configuration:
# sa-cluster-get-pods.yaml
apiVersion: v1
kind: ServiceAccount
metadata:
  name: cluster-get-pods
We create the SA:
kubectl apply -f sa-cluster-get-pods.yamlNext, we create a ClusterRole that allows to list Pods:
# cluster-role-get-pods.yaml
apiVersion: rbac.authorization.k8s.io/v1
kind: ClusterRole
metadata:
  name: get-pods
rules:
- apiGroups: [""]
  resources: ["pods"]
  verbs: ["get", "watch", "list"]
This ClusterRole will allow Pods to list Pods from all namespaces (instead of Roles that are scoped to a namespace):
kubectl apply -f cluster-role-get-pods.yamlNow, we need to bind the ClusterRole with the SA.
We can do so with the following ClusterRoleBinding configuration:
# cluster-role-binding-get-pods.yaml
apiVersion: rbac.authorization.k8s.io/v1
kind: ClusterRoleBinding
metadata:
  name: get-pods-global
subjects:
- kind: ServiceAccount
  name: cluster-get-pods
  namespace: default
roleRef:
  kind: ClusterRole
  name: get-pods
  apiGroup: rbac.authorization.k8s.io
We create the resource:
kubectl apply -f cluster-role-binding-get-pods.yamlFinally, we change the Pod configuration to use the serviceAccountName field and add the name of the SA:
# pod-get-pods.yaml
apiVersion: v1
kind: Pod
metadata:
  name: get-pods
spec:
  serviceAccountName: cluster-get-pods # Adding service account here
  containers:
  - name: get-pods
    image: alpine/kubectl:1.35.0
    command: ["kubectl", "get", "pods", "-n", "kube-system"]
We reapply the Pod configuration:
kubectl apply -f pod-get-pods.yamlAt last, we check the logs of the Pod again:
kubectl logs get-podsNAME READY STATUS RESTARTS AGE
coredns-66bc5c9577-bs6wf 1/1 Running 8 (5d2h ago) 31d
etcd-minikube 1/1 Running 8 (5d2h ago) 31d
...Boom! The Pod is able to list Pods using kubectl because it now has the required permission to do so.
Now, it’s your turn to practice!
Exercise 11: solve the RBAC ServiceAccount Permissions scenario.
DaemonSet

Simple illustration showing that a DaemonSet creates one Pod in each Node | Source: Marco Aleksic on PhoenixNap
A DaemonSet ensures that a particular Pod configuration runs on every Node of the cluster.
DaemonSets are common in Kubernetes production clusters.
They’re really useful when we need to deploy cluster-wide infrastructure that must run on every Node, such as:
Logging and monitoring (Fluentd, Prometheus Node Exporter, etc.)
Network plugins to provide networking functionalities
Storage drivers to mount storage on all Nodes
Let’s write a very simple DaemonSet configuration that echo(es) an incrementing counter every 3 seconds:
# daemonset-simple-count.yaml
apiVersion: apps/v1
kind: DaemonSet
metadata:
  name: simple-for-count
spec:
  selector:
    matchLabels:
      name: simple-for-count
  template:
    metadata:
      labels:
        name: simple-for-count
    spec:
      containers:
        - name: simple-for-count
          image: busybox
          command: ["/bin/sh", "-c"]
          args: [i=0; while true; do echo "Message $i"; i=$((i+1)); sleep 3; done]
Create the DaemonSet:
kubectl apply -f daemonset-simple-count.yamlNext, we investigate the DaemonSet resource:
kubectl get daemonsetNAME DESIRED CURRENT READY UP-TO-DATE AVAILABLE NODE SELECTOR AGE
simple-for-count 1 1 0 1 0 <none> 3sIt says that there is only one DaemonSet Pod running.
It’s expected! Minikube runs only on one Node.
The DaemonSet creates one Pod in every Node:
kubectl get podNAME READY STATUS RESTARTS AGE
simple-for-count-jc9lb 1/1 Running 0 2m36sThe Pod behaves as it should by printing Message <counter> every 3 seconds:
kubectl logs simple-for-count-jc9lbMessage 0
Message 1
Message 2
...This example is very simple. In production, we’ll create DaemonSets that run processes or serve functionalities needed for Pods in all Nodes, such as this Fluentd-elasticsearch configuration.
Now it’s your turn!
Exercise 12: solve the Create DaemonSet scenario.
Horizontal Pod Autoscaler (HPA)
Horizontal Pod Autoscalers (HPA) scale workload resources (such as Deployments and StatefulSets) based on load.
Before diving in, make sure you have the prerequisite knowledge on auto-scaling.
There are two types of metrics:
currentMetric: the current metric (i.e CPU/GPU usage, RAM, etc.) observed in the system at a point in time.
desiredMetric: specified in the HPA configuration. It’s the target metric value to monitor (i.e 80% CPU usage maximum, 4Gb RAM maximum, etc.).
Here’s how HPA works in Kubernetes:
The HPA controller identifies which Pods to monitor based on the configuration of the workload resource it manages.
Computes the desired Pod replicas:where:
is the number of desired replicas.
is the number of current replicas.
is the current metric.
is the desired metric.
Scales Pods up and down according to the current number of replicas and the desired replicas.
Let’s scale the nginx-deployment that we created in the Deployment section:
# nginx-deployment
apiVersion: apps/v1
kind: Deployment
metadata:
  name: nginx-deployment
  labels:
    app: nginx
spec:
  selector:
    matchLabels:
      app: nginx
  template:
    metadata:
      labels:
        app: nginx
    spec:
      containers:
      - name: nginx
        image: nginx:1.14.2
        ports:
        - containerPort: 80
        resources:
          requests:
            cpu: 200m
          limits:
            cpu: 500m
We made a few modifications to ensure the HPA can efficiently scale the replicas:
Removed the replicas field so as not to override the number of replicas
Added spec.template.spec.containers[].resources, this is mandatory, or the Metric Server won’t be able to collect the Pod metrics
Create the nginx-deployment:
kubectl apply -f nginx-deployment.yamlFor HPAs to work, we need to install a Metric Server in our cluster:
minikube addons enable metrics-serverIt collects the metrics from the Pods and exposes them to the Kubernetes API.
Next, we create the HPA configuration:
# hpa.yaml
apiVersion: autoscaling/v2
kind: HorizontalPodAutoscaler
metadata:
  name: hpa-nginx
spec:
  maxReplicas: 10
  metrics:
  - resource:
      name: cpu
      target:
        averageUtilization: 10
        type: Utilization
    type: Resource
  minReplicas: 1
  scaleTargetRef:
    apiVersion: apps/v1
    kind: Deployment
    name: nginx-deployment
Here’s what’s going on here:
spec.scaleTargetRef specifies which workload resource needs to be scaled.
We set spec.metrics[] to cpu with average utilization to 10%, so when the mean utilization of the Pods is higher than this value, the HPA will scale up.
We apply the configuration:
kubectl apply -f hpa.yamlcpu utilization is at 0% because we’re not sending any requests to the Pod.
MINPODS is set to 1 as we specified in the hpa-nginx using spec.minReplicas.
Now, we’ll create a service to be able to easily send requests to the Pods:
# service-nginx.yaml
apiVersion: v1
kind: Service
metadata:
  name: nginx
spec:
  selector:
    app: nginx
  type: ClusterIP
  ports:
    - protocol: TCP
      port: 8080
      targetPort: 80
You’ll need to wait a few minutes for the Metric Server to start.
Then, it’s time to monitor the state of the HPA:
kubectl get hpa -o wide --watchAt first, the REPLICAS will be set to 1 as there’s no load on the Pods’ cpu:
NAME        REFERENCE                     TARGETS       MINPODS   MAXPODS   REPLICAS   AGE
hpa-nginx   Deployment/nginx-deployment   cpu: 0%/10%   1         10        1          85s
Open another terminal to send multiple requests by running:
kubectl run -i --tty load-generator --rm --image=busybox:1.28 --restart=Never -- /bin/sh -c "while true; do wget -q -O- http://nginx:8080; done"After a few minutes, you should see the number of REPLICAS rise to 4 with the observed metric lowering to 12%:
NAME        REFERENCE                     TARGETS        MINPODS   MAXPODS   REPLICAS   AGE
hpa-nginx   Deployment/nginx-deployment   cpu: 12%/10%   1         10        4          7m5s
After 5 minutes of stopping the load generator, the HPA should come down to its initial state.
Practice time!
Exercise 13: solve the Configure HorizontalPodAutoscaler (HPA) scenario.
Network Policies
Network Policies restrict Pods’ traffic flow at the IP and port level.
We can specify how a Pod is allowed to communicate with network entities (such as Services, endpoints, etc.).
There are two types of pod isolation:
Ingress: inbound connections to a Pod.
Egress: outbound connections from a Pod.
By default, both Ingress and Egress are unrestricted: a Pod can make inbound and outbound connections with all network entities.
It is a security best practice to restrict inbound and outbound connections to only what is needed for our applications.
For Network Policies to work, we need to install a network plugin.
Luckily, minikube comes with Calico out of the box:
minikube stop
minikube start --cni calico
Next, we’ll use:
The nginx-deployment.yaml from the Deployment section
The service-nginx.yaml from the Service section
We create both resources:
kubectl apply -f nginx-deployment.yaml
kubectl apply -f service-nginx.yaml
Let’s create a Network Policy configuration:
# network-policy.yaml
apiVersion: networking.k8s.io/v1
kind: NetworkPolicy
metadata:
  name: test-network-policy
  namespace: default
spec:
  podSelector:
    matchLabels:
      app: nginx
  policyTypes:
  - Ingress
  ingress:
  - from:
    - podSelector:
        matchLabels:
          role: client
    ports:
    - protocol: TCP
      port: 80
Here’s what’s happening here:
spec.podSelector specifies to which Pods the Network Policy applies.
spec.policyTypes lists whether it includes Ingress, Egress, or both.
spec.ingress[].from[].podSelector specifies which Pod can make an inbound connection with nginx.
spec.ingress[].from[].ports[] restricts inbound connection to the port 80 exclusively.
Now we apply the configuration:
kubectl apply -f network-policy.yamlThe resource is now in the cluster:
kubectl get networkpolicyNAME POD-SELECTOR AGE
test-network-policy app=nginx 3m13sNext, we’ll create a configuration of a client that will make connections with the nginx Pods:
# nginx-load-generator.yaml
apiVersion: v1
kind: Pod
metadata:
  labels:
    role: client
  name: load-generator
spec:
  containers:
  - image: busybox:1.28
    name: load-generator
    command: ["/bin/sh", "-c"]
    args: ["while true; do wget -q -O- http://nginx:8080; done"]
  dnsPolicy: ClusterFirst
Note that we used metadata.labels to match spec.ingress[].from[].podSelector from the Network Policy configuration.
We create the client:
kubectl apply -f nginx-load-generator.yamlFinally, we check if the client can reach the nginx web server:
kubectl logs load-generator<!DOCTYPE html>
<html>
<head>
<title>Welcome to nginx!</title>It works! The client can reach the nginx Pods through the nginx-service because we created a Network Policy with Ingress rules that match the port open on the nginx container and the labels on the client Pod.
Now it’s your turn to practice.
Exercise 14: solve the Analyze and Deploy NetworkPolicy scenario.
Pod Security Standard (PSS)
Pod Security Standards (PSS) define policies to enforce security restrictions on Pods.
There are 3 types of policies called profiles:
Privileged: unrestricted policy providing the widest level of permissions (Pods bypass isolation).
Baseline: minimally restrictive policies to prevent privileged escalation (best for non-critical workloads).
Restricted: heavily restricted policies following Pod hardening best practices.
By default, Kubernetes doesn’t enforce any PSS.
Each PSS profile has a set of policies that restrict the behavior of Pods. You can click on the links of each individual profile to see what policies they contain.
Here’s how you would usually use PSS profiles:
If developing on your local machine, use no PSS or the Privileged profile (they are equivalent).
For most applications, use the Baseline profile.
For critical applications, use the Restricted profile.
We’ll see how to apply PSS in the section.
Pod Security Admission (PSA)
Pod Security Admissions (PSA) apply a set of PSS on a namespace to restrict the behavior of Pods.
PSA enforce PSS using labels in namespace configurations as follows:
apiVersion: v1
kind: Namespace
metadata:
  name: my-baseline-namespace
  labels:
    pod-security.kubernetes.io/<MODE>: <LEVEL>
    pod-security.kubernetes.io/<MODE>-version: <VERSION>
There are 3 <MODE>(s) you can use:
enforce: when a Pod violates a policy, it is rejected.
audit: policy violation is allowed but will be recorded in the audit log (a set of logs that need to be manually verified).
warn: policy violation triggers a user-facing warning.
Here’s an example of enforcing PSS(s) using PSA labels:
# namespace-using-psa.yaml
apiVersion: v1
kind: Namespace
metadata:
  name: my-baseline-namespace
  labels:
    pod-security.kubernetes.io/enforce: baseline
    pod-security.kubernetes.io/enforce-version: v1.35

    pod-security.kubernetes.io/audit: restricted
    pod-security.kubernetes.io/audit-version: v1.35

    pod-security.kubernetes.io/warn: restricted
    pod-security.kubernetes.io/warn-version: v1.35
With this configuration, any Pod that is created in the my-baseline-namespace will:
Be rejected if it violates any policy from the baseline profile.
Record logs in the audit log if violating policies from the restricted profile.
Trigger a user-facing warning if it violates policies from the restricted profile.
Be probed for security standards according to each profile version.
Let’s test this out by applying this configuration:
kubectl apply -f namespace-using-psa.yamlThe namespace has been created, and all the PSA(s) are active:
kubectl describe namespaces my-baseline-namespaceName: my-baseline-namespace
Labels: kubernetes.io/metadata.name=my-baseline-namespace
pod-security.kubernetes.io/audit=restricted
pod-security.kubernetes.io/audit-version=v1.35
pod-security.kubernetes.io/enforce=baseline
pod-security.kubernetes.io/enforce-version=v1.35
pod-security.kubernetes.io/warn=restricted
pod-security.kubernetes.io/warn-version=v1.35
Annotations: <none>
Status: ActiveSharing the hostNetwork is not allowed in the baseline policy, we’ll try to violate it!
# pod-should-be-rejected.yaml
apiVersion: v1
kind: Pod
metadata:
  name: nginx-should-be-rejected
  namespace: my-baseline-namespace
spec:
  hostNetwork: true
  containers:
  - name: nginx-should-be-rejected
    image: nginx:1.14.2
    ports:
    - containerPort: 80
The spec.hostNetwork set to true should be rejected by the PSA.
Time to create the Pod:
kubectl apply -f pod-should-be-rejected.yamlError from server (Forbidden): error when creating "pod-should-be-rejected.yaml": pods "nginx-should-be-rejected" is forbidden: violates PodSecurity "baseline:v1.35": host namespaces (hostNetwork=true), hostPort (container "my-baseline-namespace" uses hostPort 80)The Pod is instantly rejected with a clear error message.
Now, we’ll violate the restricted policy and see what happens:
# pod-should-audit-and-warning.yaml
apiVersion: v1
kind: Pod
metadata:
  name: nginx-should-audit-and-warning
  namespace: my-baseline-namespace
spec:
  securityContext:
    runAsNonRoot: false
  containers:
  - name: nginx-should-audit-and-warning
    image: nginx:1.14.2
    ports:
    - containerPort: 80
This configuration should violate the restricted policy because it uses spec.securityContext.runAsNonRoot: false.
Next, we apply the configuration:
kubectl apply -f pod-should-audit-and-warning.yamlWarning: would violate PodSecurity "restricted:v1.35": allowPrivilegeEscalation != false (container "nginx-should-audit-and-warning" must set securityContext.allowPrivilegeEscalation=false), unrestricted capabilities (container "nginx-should-audit-and-warning" must set securityContext.capabilities.drop=["ALL"]), runAsNonRoot != true (pod must not set securityContext.runAsNonRoot=false), seccompProfile (pod or container "nginx-should-audit-and-warning" must set securityContext.seccompProfile.type to "RuntimeDefault" or "Localhost")
pod/nginx-should-audit-and-warning createdThe Pod has been created, and it triggered a warning!
Unfortunately, minikube has no built-in audit log system. You can read Kubernetes’ Auditing documentation for general information about auditing.
Exercise 15: solve the Minimize Microservice Vulnerabilities with PSA scenario.
Request and Limit

Illustration of CPU request and limit | Source: Javier Martinez on SysDig
When creating a Pod, we can define resource limits and requests for each container, specifying minimum and maximum values for resources like CPU, GPU, and RAM.
Here’s an example of configuration from Kubernetes’ resource management documentation:
apiVersion: v1
kind: Pod
metadata:
  name: frontend
spec:
  containers:
  - name: app
    image: images.my-company.example/app:v4
    resources:
      requests:
        memory: "64Mi"
        cpu: "250m"
      limits:
        memory: "128Mi"
        cpu: "500m"
  - name: log-aggregator
    image: images.my-company.example/log-aggregator:v6
    resources:
      requests:
        memory: "64Mi"
        cpu: "250m"
      limits:
        memory: "128Mi"
        cpu: "500m"
In the containers[].resources field, we can use the requests and limits fields to manage the container resources.
Here’s how it works:
Using limit: the Kubelet ensures a running container does not use more resources than its limit:
For cpu: the limit is enforced by throttling.
For memory: the limit is enforced by stopping the container, causing an Out Of Memory (OOM) error.
Using requests: defines the minimal resources needed for a container to run:
The Scheduler takes it into account when placing a Pod in a Node.
The Kubelet reserves at least the request resource for the container to use.
Different unit types can be used to specify the amount of resource a Pod can use.
For cpu:
1 CPU unit means 1 physical CPU core or 1 virtual core.
Fractional units are allowed. 0.5 would be 50% of a CPU unit (equivalent to 500m).
Memory is measured in bytes. We can use 2Gi or 500Mi. Read the memory unit documentation for more on this.
You can read the Resource Management for Pods and Containers documentation for all the details on this subject.
Exercise 16: solve the request and resources scenario.
Next Steps
Congratulations! If you’ve come this far and solved all the exercises, you now have solid Kubernetes foundations!
But this is just the beginning of the journey. You’ll not be able to build production infrastructures just yet.
The next step is to choose a platform:
k3s is perfect for on-premise Kubernetes. Many practitioners build home k8s labs to get deep into the practice.
GKE is your go-to if you plan to use Google Cloud.
EKS is your best choice to run Kubernetes on AWS.
Lastly, learning k8s best practices will make the difference:
We used Helm a little bit in this walkthrough. You’ll highly benefit from getting familiar with it!
Prometheus and Grafana are amazing monitoring and observability tools for Kubernetes.
Loki is great for log aggregation.
GitOps with ArgoCD to have your k8s manifest deploy automatically after changes to your Git repositories.
Kustomize for customizing manifests across multiple Kubernetes environments.
CI/CD is mandatory to improve automation. Personally, I really like GitHub Actions, but GitLab Workflows and Jenkins are solid options too.
Infrastructure as Code (IaC) with Terraform, Terragrunt, Pulumi, or AWS CDK will greatly improve reproducibility by declaring your infrastructure with code compared to ClickOps.
Multi-environment IaC is also necessary for most production infrastructure. I’ve built Terragrunt repository templates for this, both on GCP and AWS
Good luck on your learning journey! Remember that the most important is to enjoy building, so take it at your own pace ;)
Originally posted @ https://www.axelmendoza.com/posts/kubernetes-beginner-guide/
.png)

